
-
Last session, we learned about basic periodic signals
-
We learned that they have Phase, Frequency and Amplitude
-
Phase (what point the wave is in its periodic cycle). This is often measured in degrees (
0-360) or radians (0 - 2*PI), or also by a point in time if the frequency is known. With a sine waveform, 0 degrees is the start, 90 degrees is the postive peak, 180 degrees is when it returns to the centre line, 270 degrees is the negative peak, and 360 degrees is the start of the next cycle. When we reach 360 (2*PI), we can either begin from 0 again (i.e., we can 'wrap' the phase so it's always between 0 and 360), or we can continue to increase the phase. Mathematical functions for creating waves generally take inputs in radians. Therefore, a waveform's phase at any time can be described by its position in time, or in radians (as in the above diagram), degrees, or by its real value. -
Frequency (how often they repeat their cycles). This is measured in Hertz (Hz), or CPS (cycles per second). Some people find this is a lot easier to think about than phase.
-
Amplitude (the absolute peak output, the maximum amount the speaker can move). Amplitude is between 1 and -1, with a node when it crosses zero. By absolute, we mean with the sign removed, so -1 in that case can be thought of as 1 in absolute terms, despite needing to be considered as -1 for the purposes of representing the phase of the signal either side of 0.
-
Both Amplitude and Frequency relate to Phase
-
Amplitude is the highest value the signal can produce (at its peak - remember, it's an oscillation through positive and negative phase!)
-
Frequency is how often the complete phase cycle repeats every second
-
The higher the frequency, the higher the perceived pitch
-
The higher the overall amplitude, the higher the perceived volume
-
In addition, I provided you with some notes about how we record and represent these periodic signals in a computer. They mention the Nyquist rate, The Nyquist frequency, the sampling rate, and how this relates to the frequency response of the human hearing system. I also introduced the idea of data representation in the context of bit resolution, and how this relates to amplitude
Also
-
We learned how to add periodic signals together, how this can cause distortion, and also generate beating.
-
We learned how to multiply them together to create Amplitude Modulation (AM), and how this creates sum and difference tones.
-
We learned how to use one periodic signal to control the frequency of another, and how how this creates Frequency Modulation (FM)
-
We also learned that we can create complexity by doing this; for example, increasing the modulation index of the modulating wave (i.e., its local amplitude) increases the number of overtones (without generating distortion, as the main output doesn't change - remember, we're only changing the frequency). We perceive this as an increase in brightness. Also, when the frequencies are factors or multiples of one another, or some other value, we get harmonic overtones (less beating because the nodes are in phase), and if they aren't, we get more beating (because the nodes are out of phase)
-
We tried to use basic waveforms to create a range of sounds that continually changed
-
We got a taste of the approach we need to do these things in JavaScript
-
We used variables, objects and basic functions. We also used basic operators (+, -, *, /)
-
Some of you might have come across some additional math objects (abs, exp, sin, cos). I definitely used one of these which you will have seen if you were paying close attention.
-
As promised, we're also going to look at some spectral plots so we can examine the way the signals interact in more detail:
Lets do this now: https://mimicproject.com/code/b6a1bbfa-5992-4e14-3814-0197d5984028
Homework From Last Session
I asked you to make a sound composition by forking a document, creating some new oscillator objects (maxiOsc objects), and using them to control other maxiOsc objects :-)
- Lets review the homework :-)
- Then we're going to have a question and answer session about the example code you were given just to go over the basics
- We're going to explore how to load samples and manipulate them
- We're also going to learn how to use the maxiClock object to schedule events.
- We will be using conditionals (if statements) to set the state of the program.
- As a result, we should become clearer about the use of <,>,||,==,&&, and !.
- We'll also be getting more familiar with using % (modulo)
- Last week we used the term 'sample' to describe an individual value, or number, between -1 and 1, where the individual value (the sample) was usually stored in at least 16 bits. When you string these together, you get sound. These don't have to be simple sine waves. They can be any sound. Here's an example of some JavaScript arrays with sounds in them. These are 16 bit floating point values between -1. and 1., recorded 44,100 times per second.
https://www.doc.gold.ac.uk/~mus02mg/samples.js
-
If you run all these values through a speaker at a rate which is the same as the rate they were recorded, you get a pretty good reproduction of the sound they represent. If you run the values through a speaker at a higher rate, the sound is faster and higher pitched, and if you do it more slowly, the sound is slower and lower pitched (there are some problems that occur when you do this that I'm going to talk about later)
-
If you graphed one of these lists of numbers (e.g. just plotted them) you would see the entire waveform for that sound
-
Feel free to do this in excel. You'll possibly need to copy and paste the values in to a text file, and then import it as comma separated values (.csv), making sure to select the commas as the delimiters, which should actually be obvious to excel, but it isn't unfortunately so watch out for that.
-
As we've already discussed, all sounds can be seen as a collection of sinusoidal waves added together. When they are added, they become a single waveform with lots of different frequencies interacting in complex ways.
-
This isn't something you can just understand immediately. It takes time. But you should probably spend some time thinking very hard about it.
-
In any case, it's quite common for people to describe a selection of recorded samples as a 'sample', as well as to describe an individual amplitude value within a sample as a 'sample'. Both uses are correct
- Once you have samples loaded in to memory, you can manipulate them just like any other list of numbers
- For example, you could randomly select samples, or read the samples backwards.
- Two common operations people often want to do are: speeding up the playback rate, and slowing down the playback rate
- You can easily double the speed of playback by only playing back every other amplitude value in the list
- You can also halve the speed of playback by playing every amplitude value twice.
- But how would you play back the sample at 3/4 (75%) speed? To do this you would need to be able to read an array value somewhere between two of the actual array values you have - like this
mySampleArray[1.5];. This is not possible, as each array index needs to be an integer - an actual index in the list!! - (you could just use the nearest actual value but this sounds pretty bad)
- A better idea is to work out where you think the amplitude would be at that point in the array if it did exist - e.g. somewhere between two actual values - using interpolation.
- Interpolation means 'estimating a new data point based on known data'
- There are many different kinds of interpolation used in audio
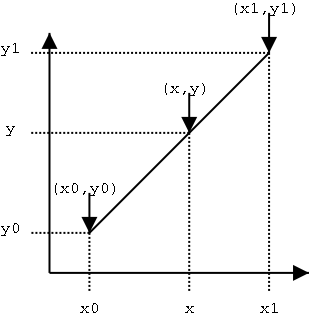
- The most common type of interpolation is called Linear Interpolation
- This attempts to plot a straight line between two points, and identify how far along that line you need to be.
- So for example, if array value 1 (point a) has a value of 0.5, and array value 2 (point b) has a value of 1.0, and you are trying to find a value halfway between these (let's call this the remainder, and it's halfway so we can say this is 0.5), you could use the below algorithm:
a + ((b - a) * remainder))- Basically, take a, and add on half the difference between b and a.
- Linear interpolation is relatively cheap in terms of computation, and works well for most things, but in audio it can generate noise in the high frequency signal components, as it is literally drawing a straight line between two points where there should instead be a curve.
- Also, in real situations, you need to calculate the remainder on the fly - it won't simply be halfway, and will depend on the playback speed.
- You can do this by subtracting the desired position (where you want to read a value from given your playback speed, e.g. [1.5]) from the nearest prior position (which would be 1 in this case).
- Like this :
remainder = position - Math.floor(position); - You can then calculate the imaginary amplitude value at that imaginary position as follows:
amplitude = ((1-remainder) * a + remainder * b);, which is more or less the same as the above.- An even better interpolation algorithm is cubic interpolation, which augments the above by calculating a curve between the two points with the help of two more points which define the slope. So you get the sample before the closest point (a), the closest point (b), and two of the upcoming points (c and d), and process these using some constants (the values of the constants depend on various factors, and it is actually a matter of taste)
- As an extra bit of information for those that are interested, there are many different cubic interpolation algorithms, and they don't all sound the same, despite the mathematical differences being not very large - this is just the nature of audio, as the ear can be very sensitive. This is one of the best sounding cubic interpolation algorithms you will find in my opinion, but :
a1 = 0.5 * (c - a); a2 = a - 2.5 * b + 2.0 * c - 0.5 * d; a3 = 0.5 * (d - a) + 1.5 * (b - c); output = (((a3 * remainder + a2) * remainder + a1) * remainder + b);
- Loading and playing back a sample is super easy using MIMIC
- You can use the maxiSample object from the Maximilian library
- First you need to create a maxiSample Object:
var mySample = new maximJs.maxiSample(); - Then you need to load in a sample (make sure you've uploaded an audio file to the MIMIC Platform first - it can be in any format your browser supports)
- Annoyingly, we have to pass the name of the audio file to the sample object you created using the main maxiAudio object (gah!).
- Don't blame me for this. It's a 'design feature' of the webAudio API that we've not been able to work around.
maxiAudio.loadSample('uploaded-sample.wav', mySample); - Now you can ask the maxiSample object to pass amplitude values stored in the audio file to the output, or do pretty much anything else you like with it.
- You can also use the maxiSample.play() functions to manipulate the sound by speeding it up, slowing it down, reversing it, triggering based on conditions etc. These mostly use linear interpolation but you can try the play4 method if you wish to listen to the cubic interpolation. Further documentation is available via Chris Kiefer's MIMIC article here (check the section on maxiSample): https://mimicproject.com/guides/maximJS
- You can also control the playback of the sample with any other signal
- maxiClock is a simple system for triggering events based on BPM (Beats Per Minute) and 'Ticks' per beat.
- BPM is a means for setting the rate of playback by how many events you want to trigger each minute
- You can also divide up each beat in to more events, called 'ticks'.
- Professional audio systems can have thousands of ticks per beat.
- Most musicians tend to use musical rhythmic concepts, specifically note durations, for dividing up beats.
- A beat is a crotchet, half a beat is a quaver, a quarter of a beat is a semiquaver (four per beat). You can also have demi-semiquavers and hemi-demi-semiquavers.
- Frankly these days you can do what you want.
- The below code sets up a maxiClock object called 'myClock'.
var myClock = new maximJs.maxiClock(); myClock.setTempo(myTempo); myClock.setTicksPerBeat(2);
- In order to make the clock count ticks, you need to run the 'maxiClock.ticker()' method in the main maximilian 'play' function.
- So if your maxiClock object is called 'myClock', you need this in 'play':
myClock.ticker(); - You can then run a test with a conditional to see if there's a clock tick happening, and if there is, make something happen.
if( myClock.tick ) { mySample.trigger();}
- You can also check to see where the maxiClock playHead is. You can then make things happen if the playHead is before, at or after a certain point:
if( myClock.tick && myClock.playHead>=100){ mySample.trigger(); // Also do anything else you fancy }
- This basic drum machine example has everything you need in it
- https://mimicproject.com/code/9538f995-f184-8a64-967c-f5de93e58076
- Here is a more developed example with the play-button code in it, and a more complex output:
- https://mimicproject.com/code/86a2fefb-4314-16dc-a7d5-fd930bd481d0
- Once you have loaded some sounds, you can control them in quite complex ways
- You can also trigger them using the maxiClock mechanism
- Further to this, you can use modulo
%to generate interesting rhythmic outcomes - You can also use randomness to generate basic decision-making systems.
- With a relatively small amount of imagination, using only these techniques, you can make some pretty exciting interactive and generative audio
- Create a soundscape or rhythmic piece that uses at least four sounds, and continually changes for over 2 minutes.
- Here's an advanced example that combines all the things we looked at in the last two weeks, as well as some other stuff including pattern generation, multiple voices, and fully implemented subtractive synthesiser examples.
- https://mimicproject.com/code/afe3b617-4ad9-97df-6c8c-818b901897eb
These are some common questions I often get asked by beginners once they get to this stage. This FAQ is getting shorter all the time as we add more MIMIC examples, but some of this might be useful to you so I'll leave it here.
- How can I make something happen visually based on a sound?
For this you need to do some form of analysis of the sound output. The first method you should probably try is to get the average of a block of samples. This is super easy using the very first example I showed you, as I'm collecting blocks of samples (the sample buffer) which gives us a list 1024 numbers around 40 times a second. You can calculate the mean, and then use this to make something happen. Another method would be to get a spectrogram (using the FFT Analyser - I recommend you check out the excellent tutorial by Nick Collins, which is here on the MIMIC Project website : https://mimicproject.com/guides/mmll ).
- I'm calculating the mean of each sample buffer and this is working OK, but sometimes it seems not to capture the intensity of the signal very well. Is there a better way?
This is because you're smoothing the signal and the peak values are therefore being flattened. You could calculate a better measure by getting the square of each of these 1024 values, getting the mean of all of these squares, and then calculating the square root of that mean. This gives you the Root Mean Square output, or RMS.
- I tried connecting the mean output of the sound to the parameter of my graphics system, but it's giving me a continuous signal. How can I trigger something based on this instead of just using the value?
You can use a conditional to check if the value goes over a certain amount, and then use this to trigger something. This bit of code is probably a good starting point (you would of course need to define these variables yourself) :
if (RMS_Output > 0.5) {myImageTrigger = True;} else {myImageTrigger = False;}
- I've got a conditional set up that is setting a boolean value to True whenever the RMS output is over a threshold value (e.g. 0.5). But the problem is, it stays true and then keeps triggering over and over again for the entire length of time that the conditional statement stays true. How can I get it to trigger once, and then not trigger again?
There are about 1000 ways to do this but the easiest method is to have a countdown which locks the conditional in a False state for a short time after it's first been triggered. Something like
if (RMS_Output > 0.5 && reTrigCounter < 0) { myImageTrigger = True; reTrigCounter+=someValue;//add some value to the reTrigCounter so it's above zero and won't trigger again next time. } else { myImageTrigger = False; reTrigCounter--//subtract one until you get to zero and you can trigger again }
But TBH this is not the best method. It's just the easiest to do if you've not done it before. A better method is to get the mean output of the last n spectral flux values and build an adaptive threshold using standard deviation, for which you'd need to do an FFT as above.
- How can I control the sound with my body?
You could use one of Louis' great tutorials to learn how to do this with your webcam. https://mimicproject.com/code/90def343-a896-31d4-d818-20d89b9bc631
- How can I make more music using machine learning approaches?
More great examples on how to do this !