Releases: CellProfiling/HPA_Convert_Sp8_To_OMETIF
Implement processing of non-z-stack images coming from Sp8 microscope (Issue #3)
New features:
- Fixed issue #3: Now also single-plane = non-z-stack images can be processed.
- Added a function that validates that the specified output path exists and otherwise prompts the user to correct it:

Implement processing of images from Stellaris 8 microscope
This new release can process files recorded at the new Leica Stellaris Microscope and prepare them for LIMS upload.
Fix issues #1 and #2 - allow LIMS to read metadata.xml and allow to process manual files
In this release two bugs have been fixed - see the issue details:
- #1 - that LIMS did not read in the copied metadata xml file.
- #2 - that the software failed to process files that were manually recorded (outside of navigator or TileScan mode)
Also a few cosmetics have been introduced:
- Wider path field in settings dialog allows to better see the path entered.

- Improved instruction text in settings dialog.

- Help button redirecting to github repo in settings dialog.

Note that the new version might notify you about some conflicts of information on X and Y for files stemming from a manual recording (#2). These, however, do not need to concern you since - as the messages say - these conflicts are fixed by the software!

Improved garbage collection, changed menu entry, less default logging
Changes
Garbage collection improved
With previous versions more and more memory was filled by the plugin over time since Garbage Collection did not run effectively. The memory could then be reduced manually during processing by clicking on the status bar in FIJI (which calls a garbage collection). From this version on the garbage collection is called (System.gc();) after each file processing.
Changed menu entry
The plugin is now launched via a CellProfiling plugins menu entry:
Plugins > CellProfiling > Extend ome.tif from Sp8 to LIMS-like ome.tif (v0.0.8)
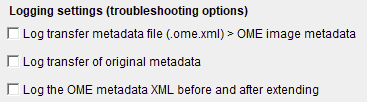
Reduced logging
The plugin no longer logs by default the XML processing, but his can still be activated by checking
 .
.
The plugin also no longer logs by default the accepted and refused files before starting the processing. However, when any of the following boxes is activated, it will log the accepted and refused files for validation purposes:
Warning for excitation within emission range
From this version on, a warning is output, if a "Light Source" with an excitation wavelength within the emission range is detected.
Example 1:
Detected Emission Range: 380 to 508 nm.
Laser Excitation Wavelength: 405 nm.
The following "notification" is output into the log window of the ProgressDialog (Window entitled "Multi-Task Manager"):
Potential problem: Excitation (405) that is within emission range (380 - 508) detected!
Example 2:
Detected Emission Range: 410 to 508 nm.
Laser Excitation Wavelength: 405 nm.
No "notification" is thrown.
Light Source also added when within emission range
The previous version of the plugin did not assign a "Light Source" for excitation if the "Ligth Source"'s wavelength was within the emission range of the respective channel. Since this became the case for a few exceptional images, where in the DAPI channel, the excitation wavelength was accidentally within the emission range, this rule needed to be adapted. From this version on the "Light Source" for excitation is also registered for a channel if it is within the emission range for the respective channel.
Example case
Channel 0:
Detected Emission Range: 380 to 508 nm.
Laser Excitation Wavelength: 405 nm.
The previous plugin version would have thrown an error (Could not find / set a wavelength for channel 0!) and not assigned any "Light Source" to the channel. From this version on, no error is thrown, instead the wavelength is added.
Catch errors for files missing acquisition date in metadata
Some leica output files seem to lack or loose the acquisition date in the metadata. For such files the acquisition date is not available for naming the output folder.
Usually the output folder is named as:
imagename (e.g., plate id and well (e.g., "if2021.lif TileScan 1 B2"))
+ " " + region name (e.g., "R1")
+ "_" + date (e.g., "20220719_111942_757"
+ "_Z" + z plane (e.g. "0", "1", "2", ...)
Files that did not provide an acquisition date failed in previous versions. From this version on, these files can be processed. As date the String "unknownDate" is used in the output folder name.
Fix user-input of output filepath
Fixed an issue with the previous version:
The previous version did not detect and use the output path specified by the user but instead the default text:

Method to search files in a file system
From this version on, a whole file system can be selected as an input "file". The plugin will automatically screen the whole sub-folder trees for suitable files (.ome.tif file, for which a MetaData folder is present in the same folder and for which this MetaData folder contains a matching .ome.xml file) and add any suitable file to the list of files to be processed.
Translate serial numbers and system type, add channel IDs
From this version on, some extra information about the hardware is stored in the OME metadata:
- The microscope type and Serial number is stored in the Microscope node as attributes:
<Microscope Model="TCS SP8" SerialNumber="8110002007" Type="Inverted"/> - The Objective Serial Number is stored in the Objective node from now on:
<Objective ID="Objective:0" Immersion="Water" LensNA="1.2" Model="HC PL APO CS2 63x/1.20 WATER " NominalMagnification="63.0" SerialNumber="11506361"/>
Fixed issues:
- In the previous version the channels had no assigned ID (e.g.,
<Channel Color="-131072" ExcitationWavelength="405.0" ExcitationWavelengthUnit="nm" ID="" PinholeSize="1.11447E-4" PinholeSizeUnit="m" SamplesPerPixel="1">) - now the Channel nodes contain IDs:
...
            <Channel Color="-131072" ExcitationWavelength="405.0" ExcitationWavelengthUnit="nm" ID="Channel:0" PinholeSize="1.11447E-4" PinholeSizeUnit="m" SamplesPerPixel="1">
                <LightSourceSettings Attenuation="0.025026133" ID="LightSource:0"/>
                <DetectorSettings Gain="99.9981315396114" ID="Detector:0" Offset="-0.0066666666666606" ReadOutRate="700.0" ReadOutRateUnit="Hz" Zoom="1.2750008511549"/>
                <FilterSetRef ID="FilterSet:0"/>
                <LightPath/>
            </Channel>
            <Channel Color="-66048" ExcitationWavelength="638.0" ExcitationWavelengthUnit="nm" ID="Channel:1" PinholeSize="1.11447E-4" PinholeSizeUnit="m" SamplesPerPixel="1">
                <LightSourceSettings Attenuation="0.015009501" ID="LightSource:3"/>
                <DetectorSettings Gain="99.9981315396114" ID="Detector:2" Offset="-0.0066666666666606" ReadOutRate="700.0" ReadOutRateUnit="Hz" Zoom="1.2750008511549"/>
                <FilterSetRef ID="FilterSet:1"/>
                <LightPath/>
            </Channel>
...