This document is somewhat long, but contains crucial information and rules to follow when working with the project's development. Unless stated otherwise, nothing included here is optional. This keeps everyone on the same page and upholds a high level of quality across the project.
Welcome to the Project 100 code repository! This document will guide you through setting up your development environment, understanding the project structure, and using Git for version control. If you have any questions, please reach out to @DistractedGames.
- You are not to touch the code in either the
masterorstablebranches.- See below for setting up branch protection on your local system to prevent mistakes.
masterbranch is the currently, in-development code for the game. It should be tested, error- and bug-free, and otherwise very stable.stablebranch represents the live version of the game's code that players are actively playing. Only merge frommasteror ahotfix-branch.
- Make a copy of the
DevTest_Templateplace within the experience to act as your own personal environment for making changes.- Do not make changes to any code within the
DevTest_Templateitself. This will be managed by @DistractedGames or @Vortex only. - Non-script instances, such as Remote Events, Models/Meshes/Parts, Animations, etc. that are needed to be added for your task are fine to add to the
DevTest_Templateonly once you submit your Pull Request. Only touch and handle what is your direct responsibility and nothing else otherwise.
- Do not make changes to any code within the
These boundaries help preserve project integrity, keeping consistency across the project and preserves the intended chain of responsibility, so that core systems remain stable and maintainable as the project scales.
Before diving into setting up your development environment, it's crucial to establish a standard for how we write code. All team members must follow the Roblox Lua Style Guide as closely as possibe, especially the section on File Structure and use type annotations from the start. --!strict typechecking mode is required. Also, enable the Studio beta feature for the new Luau type solver for the most updated type checking. Ideally, Script Analysis should be clear of all errors and warnings. These are not optional best practices—they are required for maintaining clean, readable, and efficient code across our team.
Take it from someone who comes from having worked with actual game development teams. These are industry standards for a reason and Roblox game development, while currently feeling like it sits over in a shadowing corner by itself, is still game development, and utilizing these proven standards in development will allow the team and the project to thrive.
-
Consistency Across Developers – Everyone writing code the same way makes it easier to read, debug, and collaborate. When code is predictable, it reduces the time spent deciphering different formatting styles.
-
Better Code from the Start – Applying the style guide and type annotations (in strict mode) as you write ensures that your code is structured correctly from the beginning. Writing sloppy code and trying to "fix" it later only creates more work for you and the team.
-
Faster Code Reviews and Merge Requests – Clean, well-typed code makes it much easier for me (and others) to review, suggest improvements, and merge changes quickly. Poorly formatted or loosely typed code slows down the process and increases the risk of bugs.
-
Improved Debugging and Autocompletion – Type annotations help identify issues early, provide better error messages, and enhance autocompletion in your IDE. This actually makes writing code easier and faster in the long run.
- Write properly formatted code from the start – Do not write messy or untyped code and then try to clean it up later. It should be correct as you write it.
- Use meaningful variable and function names – Avoid vague names like
data,x, orstuff. Your code should be self-explanatory and self-documented. - Comment where necessary – Explain complex logic, but don’t over-comment obvious things. Comments should clarify why something is done, not what the code does (unless it's non-obvious). Note: Many of the scripts written by Distracted Games are purposely over-commented despite this expectation. This is done for clarity in core systems.
- Use type annotations everywhere – This is mandatory for functions, tables, and any variables where types matter.
- Do not parent assets or instances to scripts - Not only is this more difficult using external editors and Rojo, it creates issues with dependencies. Instead, place them in an appropriate folder either in
ReplicatedStorageorServerStorage. - Scripts go in the
Sourcefolders and nowhere else: Keeping our scripts in these places will prevent issues down the line and allow for easier debugging as needed, including with dependencies. - We're using a Modular Framework - Every script you write should be a
ModuleScript. See below for more on this specific setup.
By following these guidelines, we ensure that our team operates smoothly, efficiently, and with high-quality code. The better we adhere to these practices, the more time we save and the better the project will be.
If you come across an issue in the code that needs to be looked at, you can create an Issue from GitHub using the tab at the top:

Make sure to first search for or look through and find if your issue has already been made by someone else.
Simply select "New Issue" from the top left on the Issues screen and make a meanningful title and include a meaningful description (if needed). Markdown is supported. On the right side, you can select an assignee using the Assignees gear. This would be who you want to have look at the issue (usually @Distracted-Games, but maybe @tyswinger, aka @Vortex). While not neccessary, adding a label can be helpful as well by using the Labels gear. If the issue is related to, but not the same as another issue on the issue board, you can select that issue as a parent using the Relationships gear or by selecting Create sub-issue from the related issue. You can also mention other issues or even pull requests using # or other developers using @.
Issues are also useful for highly visible TODO's.
Once you have your issue report set up, simply scroll down and select Create.
Note, if you need to add more context to the issue after creation, or want to add some insight to another existing issue, you can leave comments by opening the issue up.
Now, let’s get you set up! 🚀
- If you are already familiar with, and setup to use Visual Studio Code (or other editor), Git/GitHub, and Rojo, you can skip this section, though I suggest at least skimming it.
For this project, we will go through using Visual Studio Code (VS Code) as our development environment. If you're completely new to using an external code editor, such as Visual Studio Code and/or have never used SCM (Source Control Management, also referred to as Version Control) then this guide will walk you through setup and basic usage using the Visual Studio Code's user interface (and keyboard shortcuts). If you start feeling more comfortable, feel free to use the command line interface (CLI). It's just better in a lot of ways, but takes some practice.
Note: If you prefer to use another IDE, such as Neovim, then you are already likely well versed in this process. Sadly coding with Luau in Vim or Neovim isn't as well supported as VS Code (shocker, I know), so note that you may be at a disadvantage trying to code using that.
Follow these steps to set up your workspace:
- Download and Install VS Code from Visual Studio Code.
- Sign into VS Code using your GitHub account
- Click on the Accounts icon
 in the lower-left corner of VS Code.
 - Select Sign in with GitHub and follow the prompts.
- Signing in allows you to sync your settings across devices and ensures you already have access to our repository.
- Note: VS Code can also be accessed from a web browser at vscode.dev, but it has limitations in extension support. It is useful for quick edits on the go but is not a full replacement for the desktop version.
- Click on the Accounts icon
- Install required extensions:
-
Open the Extensions Tab by clicking the Extensions icon
 on the sidebar or by pressing
 Ctrl + Shift + X. -
Extensions in VS Code allow you to enhance functionality, such as adding support for specific languages and tools. This flexibility makes VS Code highly customizable for different development needs. You may find a few other extensions that help yourpersoanl workflow or maybe just a new theme for Visual Studio Code.
-
Search for and install the following extensions:
(if using Selene on your own, without the code repo, make sure to make the
selene.tomlfile and insertstd = "roblox"in that file for it to work.)- Stylua additional setup:
- Open your command palette using
Ctrl + Shift + P - Type settings json to get the option for "Preferences: Open User Settings (JSON)"
- in the settings JSON file that opens, paste the following code:
I've included both Lua and Luau to ensure it works with both file types, but you should be using"[lua]": { "editor.defaultFormatter": "JohnnyMorganz.stylua", }, "[luau]": { "editor.defaultFormatter": "JohnnyMorganz.stylua", },
.luaufile extensions for Roblox development. - Open your command palette using
- Stylua additional setup:
-
- Optional Recommended Extension:
- Material Icon Theme – Enhances file and folder icons in the Explorer for better visual organization.
- Enable Auto Save:
- Go to File > Auto Save and enable it.
- This feature saves files automatically upon changes, preventing common issues caused by forgetting to manually save with
Ctrl + S.


Note: You do not need to manually set up a Rojo project—our repository comes pre-configured for you.
Directly from the VS Code documents themselves, they state that, "The most important key combination to know is Ctrl+Shift+P, which brings up the Command Palette. From here, you have access to all functionality within VS Code, including keyboard shortcuts for the most common operations."
Sure enough, this is a super easy way to operate in VS Code and I use it all of the time myself. If you want to learn to start moving through VS Code at lightning speed, stop using the UI and use the Command Palette instead. I'll be sure to include commands for this as relevant.
For a deeper dive into the Command Palette (and Visual Studio Code as a whole) visit the Visual Studio Code Documentation.
Git is required for managing code changes and collaboration. It allows you to maintain a local copy of the repository on your system, edit your own version of the Project 100 code before commiting changes, and stay up to date with modifications made by other contributors. We will explore these processes in more detail later in this document.
- Download Git from git-scm.com
- Follow the installation instructions for your OS.
- Verify installation:
- In VS Code, open a new Terminal window (
Ctrl + `or, at the top of the screen, got to Terminal > New Terminal). - The Terminal window should open at the bottom of the sreen.
- Inside the Terminal Window, type the following command and press
Enter:If you see the installed version, you're good. If you have issues, reach out to @DistractedGames.git --version
- In VS Code, open a new Terminal window (
Once Git is installed, you need to clone the project 100 repository to your local machine. This will create a folder named Project100 automatically, so you do not need to create it manually. If you want to store the project in a specific location, such as the D: drive, on your Desktop, or in your Documents folder, you can navigate there first before cloning. If you're familiar with using the command line interface, you should do so in the Terminal Window now (e.g., cd D:). Otherwise, you can go to File > Open Folder (or press Ctrl + k then Ctrl + o) and select the parent directory you want to store the Project100 folder in.
-
Find the Repository Link on GitHub:
-
Navigate to the Project 100 repository on GitHub located here.
-
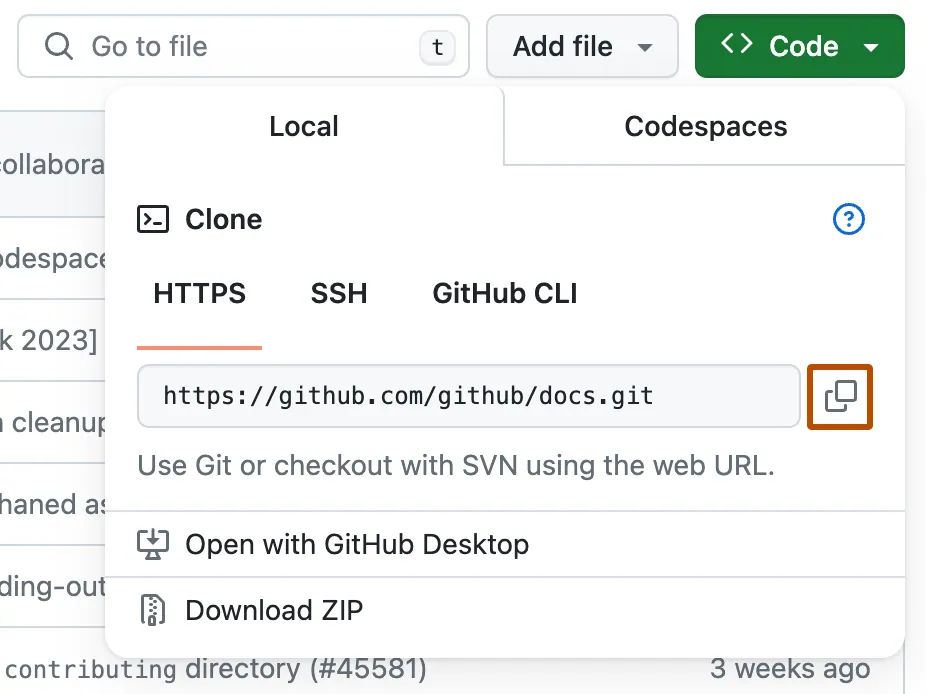
Click the
<> Codebutton at the top right of the repository page: -
Copy the provided HTTPS link:
-
-
Open a Teminal and Clone the Repository:
- Ensure the terminal is showing your desired folder location. For example, the
D:would look like this:
$ D:\>💡 You can also type
pwdint he terminal to print the working directory.- Clone the repository by typing or copy/pasting the following and pressing
Enter:
git clone https://github.com/Project-100-Official/Project100.git
- Ensure the terminal is showing your desired folder location. For example, the
-
Open the Project in VS Code:
- Open a folder as covered in Cloning the Repository and select the newly created
Project100folder. - Open the Explorer Tab by clicking on the Explorer icon
 or by pressing
 Ctrl + Shift + E.
- Open a folder as covered in Cloning the Repository and select the newly created


You should now see the project files in the Explorer Tab, ready for development.
Understanding the folder structure will help you navigate and contribute efficiently.
Project100/
├── .vscode/                     # Preset VS Code workspace settings
├── Onboarding                   # Contains this walkthrough and dependencies
├── src/                         # Main source code container
│   ├── ReplicatedFirst/         # Reserved for select scripts, such as loading screens and preloaders
│   ├── ReplicatedStorage/       # Scripts that must be accessible to **both** server and clients
│   ├── ServerScriptService/     # Scripts that must **not** be accessible to clients
│   ├── ServerStorage/           # Mostly reservered for assets but may contain project readme files
│   ├── StarterCharacterScripts/ # Scripts that must go on the character directly (resets on respawn)
│   ├── StarterPlayerScripts/    # The majority of client-side scripts, including most GUI scripts
├── .gitignore                   # List of folders or files to ignore synching to the repo
├── aftman.toml                  # Manages Rojo (despite not being supported any longer, it doesn't matter here)
├── default.poject.json          # Allows structure of project to work
├── README.md                    # Project overview and setup guide
├── selene.toml                  # Settings file for aditional Roblox linter
├── stylua.toml                  # Settings file for Stylua
💡You might also see the sourcemap.json file pop up. This is just how Luau language Server works with Rojo.
-
Each of the directories in
srccorrespond to what you would see in Roblox Studio. Inside each of these Roblox directories is aSourcefolder. All scripts will exist inside of these folders and only inside these folders. If you think you have a reason to place a script elsewhere, such asStarterGui, I would advise against it. Simply make your UI scripts inside ofStarterPlayerScript/Source/Gui. This not only keeps all of the code in easy to find locations, but also will allow for easier updates through packages. Making 100 floors using 100 places means we need to consider maintainability of the codebase and this will go a long way toward achieving with that. -
ServerStorageis a special directory. At this time, no code-running scripts are going to go inside of it. We can, however, place useful README files inside itsSourcefolder as we need. These Readme files will be designed to allow other devs to understand how specific features work. I'd call out the different files the feature relies on, give example usages, and explain how the code works in a relatively general sense so if someone needs to utilize one of those features, they can quickly and easily understand things without having to open multiple scripts and follow breadcrumbs of information. If you write up a new feature, I highly recommend you create a README for it as well. -
Make sure to check the Readme files for useful methods and modules that will be added to the repo. A number of the added utilities will save you time and effort and some will be mandatory to use. For example, in
ReplicatedStorage/Source/SharedConstants, we will have many of the game's configurations, themes, and Enums. Enums are best used for both avoiding typos and for getting an auto-complete list of available options for a specific use. As an example, if you are working with weapons in any way, you should be requiring theWeaponTypemodule. This will then give you an up-to-date list of all the weapon types in the game without having to guess or look it up.
We're utilizing a modular framework for this project, also known as a "single-script" framework. If you're unfamiliar, that just means that there is only (ideally) a single server Script and a single LocalScript in the entire project and the rest are all ModuleScripts. A module loader handles requires on both server- and client-side as well as inital functionality. It is designed to simplify dependency management, reduce boilerplate, and enforce a consistent lifecycle for your modules. Most scripts will not have to worry too much about this, but read on for the how-to.
🧠 Design Philosophy
This system enforces a two-pass lifecycle for all modules:
-
Setup Phase
Each module is required and, if it defines aSetup()method, that method is called.
This phase is for initialization tasks that do not depend on other modules, such as configuration or object registration. -
Start Phase
After all modules have completed setup, the loader calls theStart()method on each module (if present).
This phase is for activating functionality that may depend on other modules being initialized.
This implicit dependency handling avoids the need for complex graphs or manual ordering.
📦 How to Use
-
Place your modules inside the appropriate service folder:
- Server-only modules →
ServerScriptService/Source - Client-only modules →
StarterPlayerScripts/Source - Shared modules →
ReplicatedStorage/Source(these do not utilize theSetupand/orStartmethods)
- Server-only modules →
-
Each module can optionally define one or both lifecycle methods:
-- ExampleModule.luau
local ExampleModule = {}

function ExampleModule.Setup()
    print("Setting up ExampleModule")
end

function ExampleModule.Start()
    print("Starting ExampleModule")
end

return ExampleModule- The loader will automatically require and execute these methods in the correct order.
-
The loader skips any ModuleScript that does not return a table or lacks the target method (it still calls
require()on it though). -
The entry point for the ModuleLoader for the client is the
start.client.luaufile located in ReplicatedFirst. -
You can enable verbose logging by setting
config.Debug = trueinsideModuleLoader. -
When to use
Setup: While rarely used, this is a great place to put any necessary setup stuff or to resolve timing issues. For example, let's say we have a client-side script that connects a bindable event listener to run some logic. The bindable event is going to be fired from another client-side module. Without utilizing some sort of ordering, there's no way to guarantee that the event listener will be connected prior to the event being fired. If you include the event listener connection in aSetupfunnction of the first script, and include the fire call of the event in aStartfunction on the other script, you've guaranteed that the connection is set up before the other script is going to run its logic and therefore fire the event.- Other examples:
-
Prebuilding Static Data
Some modules might need to generate or cache static data tables, like mapping data, animation tracks, or some other configurations prior to other scripts then using that data. This is a decent use-case for this function.
-
Internal Configuration Setup
Setting up internal state or configurations from a ConfigModule or environment settings here ensures that the config is ready before anything like remote events or loops that use it in
Start. -
Remote Event Creation or Assignment
If you dynamically create or attach to RemoteEvents or RemoteFunctions, do it here so
Startcan safely connect them. -
Preloading or Preparing Assets
If you have assets that should be preloaded before anything visual or functional depends on them.
-
Dependency Linking (Except Module References)
If a module depends on other modules, this isn't for that. It's required before running either
SetuporStartfunctions so any require calls at the top will be performed regardless. If there's a super specific use of dependencies that need to be loaded prior to theStartfunction of either the same module or other modules.
-
When to use
Start:Startis the easy one. If you have any remote connections or function calls that need to happen when the script starts up, place them in that function. Basically anything you would have run when the script starts.
Example:
-- Module 1
local function setup()
   bindableEvent.Event:Connect(function(message: string)
      print(message)
   )
end

return {
   Setup = setup,
}
-- Module 2
local function start()
bindableEvent.Fire("This event has to fire after the connection is setup")
end
return {
Start = start,
}Note that the return values for those modules are specifically setup for modules that only need to return either Setup or Start functions, but you can also return any other values (including other API) in those tables as well. If you prefer, you can also use the typical module setup:
local ModuleName = {}

function ModuleName.Setup()
   -- logic
end

function ModuleName.Start()
   --logic
end

return ModuleName
Either way works fine.
In our repo, we don't handle RemoteEvents or RemoteFunctions as normal for Roblox development. Rather, we utilize a Network module that handles the creation of, and firing/connecting to the events and functions. Note: Bindable events are also not handled the same as before, as we use the Signal library instead.
When adding a new RemoteEvent or RemoteFunction, simply open the appropriate folder in the ReplicatedStorage/Source/Network/RemoteName folder. For example, a remote event will be added to the RemoteEventName.luau file. Make sure to add the string literal to the EnumType at the top, as well as add the Enum itself in the RemoteName table:
export type EnumType =
   "PlayerDataLoaded"
    | "PlayerDataUpdated"
    | "PlayerDataSaved"
    | "NewRemoteEvent" -- Add the new remote event's name here as a string literal.

local RemoteEventName = {
    -- PlayerData Remotes
    PlayerDataLoaded = "PlayerDataLoaded" :: "PlayerDataLoaded",
    PlayerDataUpdated = "PlayerDataUpdated" :: "PlayerDataUpdated",
    PlayerDataSaved = "PlayerDataSaved" :: "PlayerDataSaved",

    NewRemoteEvent = "NewRemoteEvent" :: "NewRemoteEvent", -- Add the new remote event Enum entry
}

return RemoteEventName
Doing this accomplishes two things:
- On server startup, the
Networkmodule will create each of the remotes that are listed in the name modules. - You can now access the remote using the
Networkmodule.
🤔How it Works
Let's use the example RemoteEvent from above ("NewRemoteEvent"). Below, we're requiring the Network module, setting a function that, when called, also fires the event (in this example, from client to server), then connects to the event to subscribe to it:
-- Client script
local ReplicatedStorage = game:GetService("ReplicatedStorage")

local Network = require(ReplicatedStorage.Source.Network)

local newValue = 0 -- For example

local function addFive(n: number)
   local result = n + 5
   -- We call the `fireServer` method from Network.
   -- First argument is the remote event name.
   -- Can include any number of other arguments, just like a normal event.
   Network.fireServer(Network.RemoteEvents.NewRemoteEvent, result)
end

-- Saving connection for disconnection later to prevent memory leaks (not shown here).
-- Similar to before, `connectEvent` takes the remote event name as the first argument.
-- The second argument is the callback function, just like a normal `Connect` would have.
local connection = Network.connectEvent(Network.RemoteEvents.NewRemoteEvent, function(value: number)
   newValue += value
   print(newValue) -- Should print 50 (20 + 5 + 25)
end)

addFive(20)
-- Server script
local ReplicatedStorage = game:GetService("ReplicatedStorage")
local Network = require(ReplicatedStorage.Source.Network)
local function doubleNumber(player: Player, n: number)
local result = n + n
-- As with the others, the first argument for `fireServer` is the remote name.
-- The second argument is the player to send the event to.
-- You can have any number of additional arguments after.
Network.fireClient(Network.RemoteEvents.NewRemoteEvent, player, result)
end
-- Notice we're not having to use `onServerEvent`, only a single `connectEvent`.
-- Just like a normal client to server event, the receiver gets the player object as the first argument,
-- which lines up perfectly to our function's expected parameters.
local connection = Network.connectEvent(Network.RemoteEvents.NewRemoteEvent, doubleNumber)An addition the Network module gives over normal RemoteEvent usage is the ability to fireAllClientsExcept. This event fires to all clients except the given player (second argument, structured just like a firClient event: Network.fireAllClientsExcept(Network.RemoteEvents.NewRemoteEvent, player)).
Hopefully this simple example is enough to help clarify how to use the Network module in place of traditional Remotes, but like everything else, if you need help or have questions, hit up @DistractedGames.
We want to strive for good clean code in the project and one major benfit of Luau over vanilla Lua is the ability to utilize Typechecking similar to a more strictly typed language. Roblox is set to use --!nonstrict mode by default, which means, if you do not declare a data type for a value, the interpretor will infer the data type for you:
local num = 10 -- inferred data type is number
local str = "Hello" -- inferred type is string
However, if you do declare the type for a value, the linter will try and enforce this by warning you if the data type doesn't match what was assigned:
local num: number
num = "Hello" -- Gives a typecheck error. num expected a number, but got a string
As you can imagine, this can be quite useful for debugging and writing the code correctly in the first place, but this can also aid in autocompletion.
Here, we're using FindFirstChild to find "MyPart" in the workspace. FindFirstChild returns an Instance? (Instance if found or nil if not found). While a part is an Instance, parts also have additional properties, methods, and events that the base Instance class does not, meaning if we try and type "part.Touched", for example, autocomplete will not aid us in this since the Touched event is not a member of the Instance class. Instead, we can cast the result of FindFirstChild to be a "BasePart" to fix this. A BasePart is either a Part or MeshPart, so covers both objects and should always be used in that case. We can "cast" a value to be a specifid type by using two colons ::
local part = workspace:FindFirstChild("MyPart") :: BasePart?💡*Note the ? as well. This means it could be nil. FindFirstChild returns an instance or nil and the returned value needs to be verified before use.
Obviously, the benefits go beyond this, but the subject of typechecking is more than this section of the guide is going to try and cover.
What I am going to cover here is how to enabel typechecking to be in --!strict mode instead. This mode means we need to ensure that we're writing our code as safely as possible and the linter will let us know if it's not quite right. Granted, this does mean you will need to write a little more code, but it will yell at you if you fail to perform a sanity check, for example, so the benfits outweight the minor inconvenience.
Since we're using Luau Language Server as our language server, simply putting --!strict at the very top of our script is enough to enable it jsut like in Roblox Studio.
Just about every script we write should strive to use this mode and should be as error and warning free as possible. There are some cases where you may struggle significantly to resolve a typecheck error in your script. If you exhaust all options for fixing it — including asking, then and only then can you switch it over to --nonstrict. Never use --!nocheck in a P100 script
In this project, we follow a structured Git branching strategy to ensure smooth collaboration and code management. If you’re new to Git, don’t worry—this section will guide you through the process of working with branches, committing changes, and keeping your code up to date.
For more specific details about the branching strategy, please review the Git Branching Strategy guide.
- master – Main branch containing the latest development changes.
- stable – Reflects the latest production-ready release.
These branches have a limited lifespan and serve specific purposes:
- feature-* – New features or enhancements.
- bug-* – Fixes for known issues.
- hotfix-* – Critical fixes for the production environment.
- refactor-* – Code optimization and restructuring.
Before creating a new branch, you must always pull the latest changes from origin/master (origin meaning from the online GitHub repo). This ensures your branch is up to date and prevents conflicts.
🚨 You should never work directly in master and definitely not stable! Always create a new branch from origin/master unless creating a sub-branch from another feature branch.
Using CLI:
git fetch origin                       # Fetch latest changes
git checkout master                    # Ensure you're on master (but not working in it)
git reset --hard origin/master         # Reset master to match origin/master
Using VS Code UI:
-
Open the Source Control panel by clicking the Source Control icon
 or by pressing
 Ctrl + Shift + G. -
Click on the "..." button (More Actions):

-
Hover over Pull, Push and select Pull (Rebase)


Using the Command Palette:
- Open the Command Palette with
Ctrl + Shift + P - Type 'pull rebase' and it should be the top option selected, so you can just hit
Enter- Note that the Command Palette is a fuzzy search, so as you type it updates the results. You may only need to type 'pullr' to get the correct option. Also note that it saves your most recent actions, so you may not have to type anything at all if you've used the command recently.
🚨 This ensures your local master branch exactly matches origin/master before branching.
Included in the repo is a scripts/ folder. Inside that folder are a couple of bash scripts that will add a pre-push hook into .git/hooks and prevent accidentally pushing code directly to the master or stable branches. Follow the instructions below to install it:
- Open your terminal either by using the keyboard shortcut
Ctrl + `or by going toTerminal > New Terminal

- Copy and Paste or type the following command exactly, then press
Enter:
bash scripts/setup-hooks.sh- Test it worked by typing the following and pressing
Enter(MAKE SURE NO CHANGES HAVE BEEN MADE TOmasterBEFORE DOING THIS)
git pushYou should receive the following message if it is set up correctly:
❌ Push to master is blocked. Create a feature branch and use a pull request instead.As per the Git Branching Strategy, when adding a new feature or bug fix, you must create a branch from origin/master. Hotfixes must actually branch from stable.
When making a new feature branch, the name of the branch should be feature- followe dby the name of the feature. For example, a double-jump feature branch would be named feature-DoubleJump. If making a bug fix branch, the name should be bug- followed by a name for the bug (try to remain short and concise here). Finally, for hotfix branches, hotfix- and the hotfix name. (Unfamiliar with what a hotfix is? Check here)
Using CLI:
git fetch origin                                    # Ensure you have the latest changes
git checkout -b feature-FEATURE_NAME origin/master  # Create a new branch from origin/master
git push -u origin feature-FEATURE_NAME             # Push branch to GitHub
Using VS Code UI:
-
Open the Source Control panel (
Ctrl + Shift + G) and click on the branch name (or on the branch name at the bottom left corner of the workspace window):
-
Select "Create new branch from..." and select
origin/master- Your local
mastershgould be up to date if you've followed the workflow, so you could also branch frommasterhere instead.
- Your local
-
Name the new branch according to the naming rules mentioned at the start of this section (e.g.
feature-*,bug-*, etc.)

Using the Command Palette:
- Open the Command Pallet and type 'create branch from' and follow the same steps as the UI above.
This will place you in your own copy of the master code repo and allow you to develop without interfering with any other code changes and without being interferred with.
After editing, creating, or deleting files, you need to stage, commit, and push your work.
Using CLI:
git add .                                 # Stage all changes
git commit -m "Add feature description"   # Commit changes with a message
git push origin feature-*                 # Push changes to GitHub
Replace * with the actual name of your feature branch.
Note: You can stage specific files for changes rather than all changes by using git add [InsertFileLocation].FileName
Using VS Code:
-
Open Source Control (
Ctrl + Shift + G) -
Click the
+button next to modified files (or click the "Stage All"+, arrow pointing to it):
-
Enter a commit message (see below).
-
Click "Commit"

If, at this point, your branch has not been published to the online repository, the "Commit" button will change to say "Publish Branch". Go ahead and click this to publish your new branch to the online repo or use the CLI command below. Otherwise, the button should show "Sync Changes". Clicking this will again push the changes to the online repo.
CLI Command for Publishing a new branch to GitHub:
git push origin feature-*Replace * with the actual name of your feature branch.
You may encounter the button showing somethign similar to the following:

In this case, the number shown and the down arrow means there are 65 changes in the origin that need to be synced to you loacal repository. Make sure to stay updated.
Commit messages are an essential part of version control. They serve as a record of changes made to the codebase and help you (and others) understand the purpose of each change. A good commit message is short, clear, and descriptive. Here are a few tips:
- Start with a brief summary: Describe the change in one concise line. For example:
Fix typo in README fileorAdd new character pathfinding functionality. - Use the imperative mood: Write messages as if you are giving commands, e.g., "Add..." instead of "Added...".
- Focus on the why or what, not the how: Explain the purpose or result of the change instead of the technical details. Save the technical information for the detailed message (if needed).
- Avoid vague terms: Be specific and avoid phrases like "small fixes" or "updated stuff."
No worries! If you accidentally commit without leaving a message, VS Code allows you to fix this easily. It should open the commit in the workspace window. Simply type your commit message at the top and close the file (Ctrl + w) to save it. You can also amend the last commit and add a message:
- Open the Source Control view (
Ctrl + Shift + G). - Make sure no new changes are staged.
- Click on the menu next to "Commit" and select "Commit (Ammend)."
- You'll be able to provide a commit message or change the commit message from the window described above once it opens in the workspace.
Sometimes, a simple one-liner isn’t enough to fully explain your changes. You can add a detailed message alongside your summary:
- Write the concise summary in the commit message box.
- Using
Shift + Enter, leave an empty line below the summary. - Add a more detailed explanation of your changes. For example:
Add player health regeneration feature

added logic for regenerating player health every 5 seconds. Also fixed a bug where health regeneration stopped under certain conditions.
VS Code also has a "Generate Commit Message with Copilot" option:

Copilot can analyze your changes and suggest a commit message for you. However, it's important to review the message before committing. Sometimes the suggested messages might not fully capture the intent or context of your changes, so make sure to edit or refine them as needed.
While working on a branch, you should regularly pull from origin/master using Pull (Rebase) to stay updated.
Using CLI:
git fetch origin              # Get latest changes
git rebase origin/master      # Reapply your changes on top of the latest master
# Review any merge conflicts, accept either incoming or current (usually incoming)
Using VS Code UI:
-
Open the Source Control view (
Ctrl + Shift + G). -
Click on the "..." button (More Actions):
-
Hover over Pull, Push and select Pull (Rebase)
🚨 Rebasing helps prevent messy merge conflicts* and keeps your feature branch in sync with master. *Conflicts can still happen during rebase if your local changes touch the same lines/files as the remote changes.
The difference is:
- With a merge, all conflicting changes are handled at once, in a potentially huge merge commit.
- With a rebase, conflicts are handled commit by commit, which can be easier to reason through.
Example: If you made 3 commits locally, and only the 2nd conflicts during rebase:
- Git will stop at that commit.
- You resolve just that conflict.
- Then continue the rebase (using the UI or):
git rebase --continueWhile this should be minimal if you're keeping to your own code and not affecting scripts outside of your task, it's understandable that sometime you need to tie into or make minor changes to existing scripts. When this happens, it's possible and even likely that you will see a merge conflict when rebasing/pulling from master. If a conflict occurs, you will be presented with the file the conflict happened in and see your changes (what exist on your system) and the incoming changes (what exist in the GitHub repo). This window will look something like this, showing each line with conflicts:

In the bottom right corner of the file will be a button allowing you to resolve any conflicts in the Merge Editor:

This will open the 3-way Merge Editor. On the top-left side, you will see the incoming changes. On the top-right, your existing changes. The screen beneath those is the final state of the file after either accepting the incoming changes or selecting to keep your own changes:

🚨 IMPORTANT: There's usually a reason that the file has changes like it does. Unless it's something truly trivial, make sure to check with the group chat (or DM the previous author) and see if there's a reason you should have to keep those changes, or to argue that your changes are preferred. If all else fails, you can include both changes by selecting "Accept Combination" and even selecting which change to include first. Also note that, even if you overwrite with your changes, during the final merge of your branch into the master branch, it will be reviewed and handled there as well, so don't sweat the small stuff.
One you've completed accepting changes one way or the other, select the "Complete Merge" button in the bottom right corner to complete the changes:

🚨 IMPORTANT: You will only ever be deleting your own online branches. Never delete another developer's branch unless explicietly asked to for some reason.
Once you’ve completed work on your feature branch (or bug fix/hotfix), the next step is to create a Pull Request on GitHub to merge your branch into the master branch. Then you can cleanup your local branches.
Follow these steps to make sure everything is smooth and well-organized:
Using CLI:
- Ensure you're in your feature/bug/hotfix branch (using a feature branch as demonstration):
- Open the terminal and run:
Replace
git checkout feature-**with the actual name of your feature branch. - This will set you in your local version of the
feature-*branch.
- Open the terminal and run:
- Push the feature branch up to GitHub:
- Run:
Replace
git push origin feature-* # Push changes to GitHub
*with the actual name of your feature branch.
- Run:
Using VS Code UI:
-
Switch to the
feature-*branch:-
Open the Source Control panel (
Ctrl + Shift + G) and click on the branch name (or on the branch name at the bottom left corner of the workspace window): -
Select
feature-*(notorigin/feature-*) Replace*with the actual name of your feature branch.
-
-
In the Source Control view, click on the "..." button (More Actions):
-
Hover over Pull, Push and select Push
- Make sure there are not unstaged or committed changes.
The next step is to create a pull request to merge your feature branch into master on GitHub:
-
Navigate to the GitHub repository
-
Open the Pull Requests tab and select New Pull Request, or you may see the following, in which case, if it's your feature branch, click the Compare & pull request button:

-
Ensure you've selected your feature branch as the source and
masteras the target:
-
Add a clear title and description for the pull request to explain the changes you’ve made.
-
On the right side of the Pull Request window, you can assign the request to @Distracted-Games.


Note: Only the project lead (@DistractedGames) will review and handle the merging of pull requests for now. Developers are responsible for creating the pull request but should not merge it themselves.
After creating the pull request, you can delete the local feature branch on your own system to keep your workspace tidy:
Using CLI:
- Run the command:
git branch -d feature-*
*Note: You may need to use a capital -D if it has an issue deleting it.
Using VS Code UI:
-
Open the Source Control view (
Ctrl + Shift + G). -
Click on the "..." button (More Actions):
-
Hover over Branch and select Delete Branch...
-
Select your feature branch
Once the pull request has been reviewed and merged by @DistractedGames, the published feature branch on GitHub will be cleaned up as needed. You don’t need to worry about deleting it yourself—@DistractedGames will handle this step to ensure proper repository management.