Attention this is still in early development it will work but performance needs to be improved.
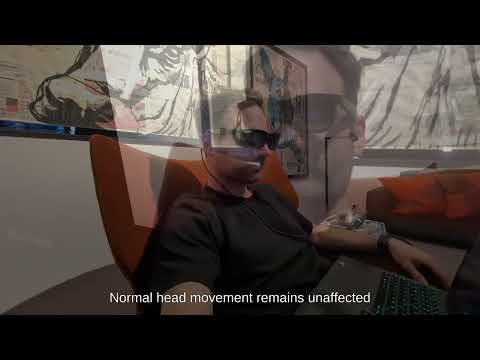
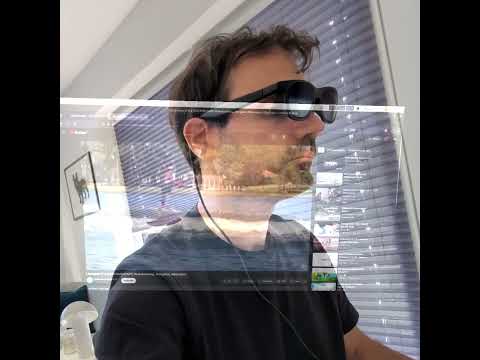
v4l2_gl displays a local screencast ( any Wayland compatible desktop ), a video input ( i.e. USB HDMI capture cards ) or captures an input video from a HDMI-in on an OrangePI 5 Plus using the hdmirx V4L2 device, on a virtual screen. It supports the IMU from Viture Pro XR glasses for a 3DOF controlled screen.

Connect the Viture glasses and configure it to extend your desktop ( don't set it to mirror the main display ). Launch the v4l2_gl on the new desktop that is shown in the glasses.
When the screencast popup appears select the main display as the source. This will show the main display in the v4l2_gl app window tracked to your head movements.
To run this as intended you need an OrangePi 5 Plus with armbian ( we are using BredOS ) that has Device Tree Overlays enabled and has the hdmi-rx device tree overlay active.
If you are using a Raspberry Pi or other device without HDMI-in you need a USB capture card that is supported on your Linux version

For testing purposes you can run it on a laptop with a webcam.
This requires a linux based OS and installed gcc and build tools.
To compile and run this application, ensure the following libraries are installed:
-
OpenGL and GLUT libraries: These are essential for creating the window and rendering graphics. On Debian/Ubuntu-based systems, you can install them using:
sudo apt update sudo apt install freeglut3-dev -
libv4l2 library:
sudo apt install libv4l-dev -
libhidapi-dev (optional): If your are using the revers engineered protocol instead of the official Viture SDK
sudo apt install libhidapi-dev -
libglib2.0-dev and libpipewire-0.3-dev (optional): Required for the
--xdgportal screen capture feature on Wayland.sudo apt install libglib2.0-dev libpipewire-0.3-dev
Depending on the architecture you are running it on use the reverse engineered protocol version ( ARM ) or the official Viture SDK version ( X86 )
make
This will generate the executable v4l2_gl
make viture_sdk
This will generate the executable v4l2_gl_viture_sdk
To run the application without root permissions, you need to set up a udev rule to grant the necessary permissions to the Viture device.
-
Ensure your user is in the
plugdevgroup. You can check your groups by running thegroupscommand. If you are not in theplugdevgroup, you can add yourself with:sudo usermod -aG plugdev $USERYou will need to log out and log back in for this change to take effect.
-
Install the
udevrule. The application can automatically install the required udev rule for you. Run the following command withsudo:sudo ./v4l2_gl --install-udev-rules
This will create the file
/etc/udev/rules.d/99-xr_virtual_display.ruleswith the correct content. If the file already exists, it will not be modified. -
Reload the
udevrules. For the changes to take effect, reload theudevrules with the following command:sudo udevadm control --reload-rules && sudo udevadm trigger
After completing these steps, you should be able to run the application without sudo.
If you prefer to install the rule manually, follow these steps:
-
Create a
udevrule file. Create a new file named99-xr_virtual_display.rulesin the/etc/udev/rules.d/directory:sudo nano /etc/udev/rules.d/99-xr_virtual_display.rules
-
Add the
udevrule. Add the following line to the newly created file:SUBSYSTEMS=="usb", ENV{DEVTYPE}=="usb_device", ATTRS{idVendor}=="35ca", ATTRS{idProduct}=="101d", MODE="0666", GROUP="plugdev"
Execute the compiled application from your terminal:
./v4l2_gl [options]
or
./v4l2_gl_viture_sdk [options]
Quickly shake your head left/right 3 times to reset the rotation to the center position after the IMU has drifted too far.
The application supports the following command-line options:
-
--install-udev-rules: Installs the necessary udev rule to run the application without root permissions. Example:sudo ./v4l2_gl --install-udev-rules -
--device <path>: Specifies the V4L2 device path (e.g., /dev/video0). Not used if--xdgis enabled. Default:/dev/video0. Example:./v4l2_gl --device /dev/video1 -
--fullscreen: Runs the application in fullscreen mode. Use the window-x flag to position the window on the correct display before it switches to fullscreen. Default:false(disabled). Example:./v4l2_gl --fullscreen -
--window-x <position>: Sets the initial X position of the application window.<position>is an integer value. Default:0. Example:./v4l2_gl --window-x 100 -
--window-y <position>: Sets the initial Y position of the application window.<position>is an integer value. Default:0. Example:./v4l2_gl --window-y 100 -
--fps <value>: Sets the target frames per second (FPS).<value>is an integer. Default:30. Example:./v4l2_gl --fps 60 -
--viture: Enables integration with Viture headset IMU for controlling the rotation of the displayed plane. The Viture SDK and device must be correctly set up. Default:false(disabled). Example:./v4l2_gl --viture -
--xdg: Use XDG Portal for screen capture on Wayland-based systems instead of a V4L2 device. Default:false(disabled). Example:./v4l2_gl --xdg -
--test-pattern: Displays a generated test pattern on the plane instead of the live camera feed. Useful for testing rendering and transformations. Default:false(disabled). Example:./v4l2_gl --test-pattern -
--plane-distance <distance>: Sets the distance at which the plane orbits the world origin.<distance>is a floating-point value. Default:1.0. Example:./v4l2_gl --plane-distance 0.5 -
--plane-scale <scale>: Sets a scale multiplier for the size of the plane.<scale>is a floating-point value (must be > 0). Default:1.0(original size). Values greater than 1.0 enlarge the plane, less than 1.0 shrink it. Values <= 0.0 are reset to 1.0. Example:./v4l2_gl --plane-scale 1.5 -
--curved-display: Renders the video stream on a curved, cylindrical surface instead of a flat plane. The radius of the curve is controlled by--plane-distance. Default:false(disabled). Example:./v4l2_gl --curved-display -
--curve-angle <angle>: Sets the total arc angle of the curved display in degrees. Only effective when--curved-displayis enabled. Default:90.0. Example:./v4l2_gl --curved-display --curve-angle 90 -
--cursor-mode <mode>: Sets the cursor rendering mode when using--xdgfor screen capture.1: Hidden2: Embedded (cursor is part of the video stream)4: Direct draw (cursor is rendered separately) If not specified, the portal's default behavior is used. Example:./v4l2_gl --xdg --cursor-mode 2
You can combine these options.
Using a V4L2 device:
./v4l2_gl --device /dev/video1 --viture --fullscreen --plane-distance 0.8 --plane-scale 1.2This command would:
- Use V4L2 device
/dev/video1. - Enable Viture IMU.
- Run in fullscreen.
- Set the plane orbit distance to 0.8 units.
- Scale the plane to 120% of its original size.
Using XDG Portal for screen capture:
./v4l2_gl --xdg --viture --fullscreen --cursor-mode 2This command would:
- Use the XDG portal for screen capture (e.g., on Wayland).
- Enable Viture IMU.
- Run in fullscreen.
- Show the embedded mouse cursor
Using the curved display:
./v4l2_gl --xdg --viture --curved-display --plane-scale 1.5 --curve-angle 90This command would:
- Use the XDG portal for screen capture.
- Enable Viture IMU.
- Render the display on a curved surface.
- Set the radius of the curve to 1.5 units.
- Set the arc of the curve to 80 degrees.
- Add support for USB HDMI capture cards to support SBCs that don't have HDMI-in like Raspberry PIs
- Add XDG portal support for screen capture on Wayland
- Fix errors in reverse engineered viture SDK
- Improve performance of the hdmi texture conversion
- Support MJPEG format to increase framerate of USB capture cards
- Add quick gesture to recenter the rotation
- Add curved screen option