
| Documentation | Paper |
Latest News 🔥
- [2026/03] OpenOptics has been accepted by NSDI'26!
OpenOptics is a general framework for realizing different optical data center network architectures in a plug-and-play manner. With OpenOptics, users can deploy customized optical data center networks on the testbed, emulation, or simulation with ~10 lines of Python code. Under the hood, user configurations are converted to control plane programs and deployed to the underlying OCSes and P4 switches.
Supported backends:
- Mininet — full software emulation using BMv2 software switches and Mininet networks.
- Tofino — deployment on Intel Tofino2 programmable switches (SDE 9.12.0). See docs/tofino-backend.md.
- ns-3 — in-process packet-level simulation via ns-3's Python bindings. See docs/ns3-backend.md.
OpenOptics has three installation paths — pick the one that matches the backend you need.
The ymlei/openoptics:latest image ships a fully built BMv2, Mininet, and
all native dependencies. Add the Python package on top with pip.
# If you're on a remote machine, forward the dashboard port first:
ssh -L localhost:8001:localhost:8001 YOUR_MACHINE

# Pull and enter the container:
sudo docker pull ymlei/openoptics:latest
sudo docker run --privileged -dit --network host --name openoptics \
     ymlei/openoptics:latest /bin/bash
sudo docker exec -it openoptics bash

# Inside the container:
pip install "openoptics-dcn[mininet]"
openoptics-gen-examples          # copies ./examples/ into cwd
python3 examples/mininet_routing_direct_perhop.py
The dashboard (FastAPI + Uvicorn) starts in-process automatically when your script creates a BaseNetwork with use_webserver=True (the default).
Then try h0 ping h1 / h2 ping h3 inside the OpenOptics CLI.
VS Code Dev Containers also works — Ctrl+Shift+P → "Dev Containers: Reopen in
Container" after git cloneing this repo (.devcontainer/ wires up the same
image).
If you'd rather build the image yourself or install editable from source,
see the Mininet source-build section in docs/installation.md.
The Tofino backend only needs Python on your workstation — the heavy dependencies (Intel SDE, P4 compiler) live on the switches and are invoked over SSH.
pip install "openoptics-dcn[tofino]"
openoptics-gen-config            # writes ./openoptics-tofino.toml
# edit the placeholders (USER, jumphost.example.com, IPs, MACs), then run
# a Tofino example — see docs/tofino-backend.md for a full walkthrough.
See docs/tofino-backend.md for prerequisites and config details.
The ns-3 backend drives a local ns-3 build via its Python bindings. Our OpenOptics-specific primitives (OCS, ToR, calendar queue, ...) ship as a standard ns-3 contrib module, and the helper CLI links everything up:
# one-time system deps (ns-3's own build requirements; Debian/Ubuntu)
sudo apt install git g++ cmake python3-dev python3-setuptools \
                 libgsl-dev libxml2-dev pkg-config

pip install "openoptics-dcn[ns3]"

# clones pinned ns-3 (default ns-3.44), symlinks our contrib module in,
# and runs ./ns3 configure --enable-python-bindings && ./ns3 build
openoptics-install-ns3 ~/ns-3-dev
The installer records the chosen ns-3 checkout in ~/.openoptics/ns3_env.json,
so subsequent OpenOptics scripts pick it up automatically — no shell exports
needed. To use from ns import ns directly outside OpenOptics, evaluate the
exports the installer prints (or run openoptics-install-ns3 --print-env-only ~/ns-3-dev).
Already have an ns-3 checkout you want to reuse? Pass --skip-clone:
openoptics-install-ns3 --skip-clone /path/to/existing/ns-3-devThe ns-3 backend runs end-to-end for the supported capability envelope
(one host per ToR, traffic-oblivious mode, per-hop and source routing).
Traffic-aware mode and multi-host-per-ToR are in progress. See
docs/ns3-backend.md for the full walkthrough of
the install pipeline, contrib-module layout, cppyy Python-binding load
path, and the set of backend-specific kwargs (guardband, link delays,
dashboard cadence, SR cur_node verification).
After pip install, these commands seed your working directory:
openoptics-gen-examples          # examples/
openoptics-gen-tutorials         # tutorials/
openoptics-gen-config            # openoptics-tofino.toml (Tofino config template)
openoptics-install-ns3 # clones + builds ns-3 with our contrib module (ns-3 backend only)python3 examples/mininet_routing_direct_perhop.py
Then you can try ping in your optical DCN,
h0 ping h1
h2 ping h3
OpenOptics User APIs are located in openoptics/Toolbox.py.
This file defines a number of useful functions for creating optical topologies, deploying routing, and monitoring the network.
Every OpenOptics network is a BaseNetwork object:
net = Toolbox.BaseNetwork(
    name="my_network",
    backend="Mininet",
    nb_node = 4,
    time_slice_duration_ms = 32, # in ms
    use_webserver=True)
You can use connect(time_slice, node1, node2, port1, port2) to connect ports of two nodes at the given time slice.
net.connect(node1=0,port1=0,node2=1,port2=0,time_slice=0)
net.connect(node1=2,port1=0,node2=3,port2=0,time_slice=0)
net.connect(node1=0,port1=0,node2=2,port2=0,time_slice=1)
net.connect(node1=1,port1=0,node2=3,port2=0,time_slice=1)
net.deploy_topo()
Or you can use provided high-level topology generators:
circuits = OpticalTopo.round_robin(nb_node=8)
net.deploy_topo(circuits)
or
circuits = OpticalTopo.opera(nb_node = 8, nb_link=2)
net.deploy_topo(circuits)
Next, you can define routing by adding time-flow table entries (as forwarding tables in electrical DCNs) add_time_flow_entry(node_id, entries, routing_mode).
Or use provided high-level routing generators:
paths = OpticalRouting.routing_direct(net.get_topo())
net.deploy_routing(paths, routing_mode="Per-hop")
Once you have created a BaseNetwork object, and defined its topology and routing, start the network by simply calling net.start().
Now run your Python file and your first optical DCN is deployed!
net.start() launches a command line interface defined in openoptics/OpticalCLI.py.
This CLI is an extension of Mininet's CLI, with added support for optical DCNs, e.g. to query the number of queued packets in switches and the network's packet loss rate.
You can find example scripts configuring different architectures under examples/ — or, after pip install, run openoptics-gen-examples to copy them into your current directory.
The dashboard starts automatically when you create a BaseNetwork with use_webserver=True (the default) — FastAPI + Uvicorn run in-process on the main Python interpreter, so no separate setup step is needed.
In your web browser, visit http://localhost:8001 to view the dashboard.
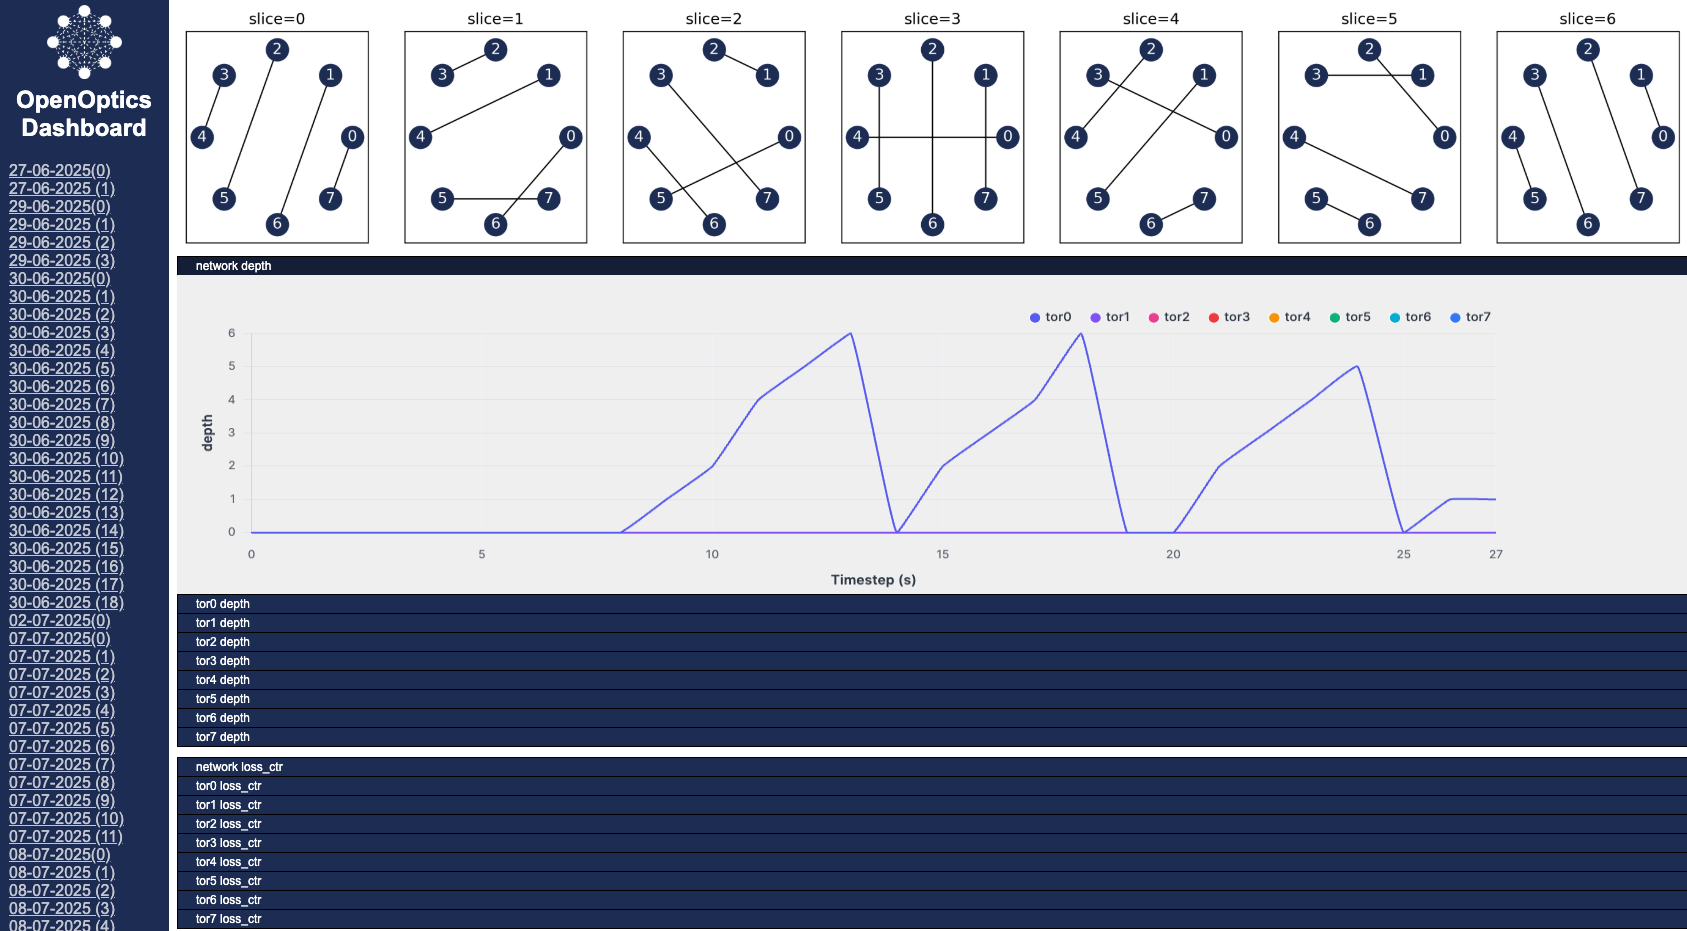
The dashboard displays the network topology, along with realtime graphs of network performance served via WebSockets.
Note: If you're running OpenOptics at a remote machine, make sure to enable port forwarding by passing -L8001:0.0.0.0:8001 to ssh.
If you use OpenOptics for your research, please cite our paper:
@inproceedings {316650,
author = {Yiming Lei and Federico De Marchi and Jialong Li and Raj Joshi and Shu-Ting Wang and Xiaoqi Chen and Balakrishnan Chandrasekaran and Yiting Xia},
title = {{OpenOptics}: Enabling Open Research and Implementation of Optical Data Center Networks},
booktitle = {23rd USENIX Symposium on Networked Systems Design and Implementation (NSDI 26)},
year = {2026},
isbn = {978-1-939133-54-0},
address = {Renton, WA},
pages = {987--1004},
url = {https://www.usenix.org/conference/nsdi26/presentation/lei-optical},
publisher = {USENIX Association},
month = may
}- For technical questions and feature requests, please open a GitHub Issues
- For discussions and collaboration, contact us at ylei@mpi-inf.mpg.de