Configuration
Please follow this after the steps in the Deployment Wiki have been completed.
- Key Vault is not included as part of the ARM Template deployment. Please utilize any existing Key Vault, or create a new one.
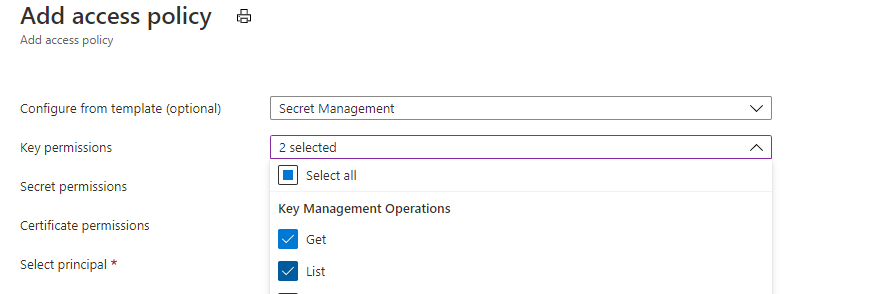
- In the Key Vault, add the App registration in the Access Policy for all 3 Applications for Get and List for secrets and also Get, wrap and unwrap for keys. Refer below snips:

- Make sure the user running the program has the above access provisioned in the key vault for their identity.
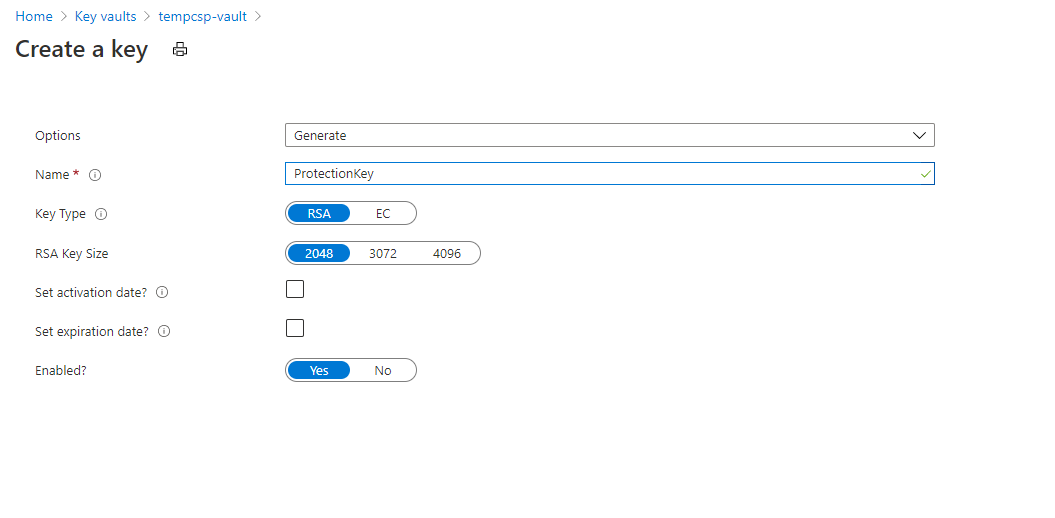
- Create a new key in the Key Vault as show below:
- Once the key is created, copy the Key URL and replace it in the code below.
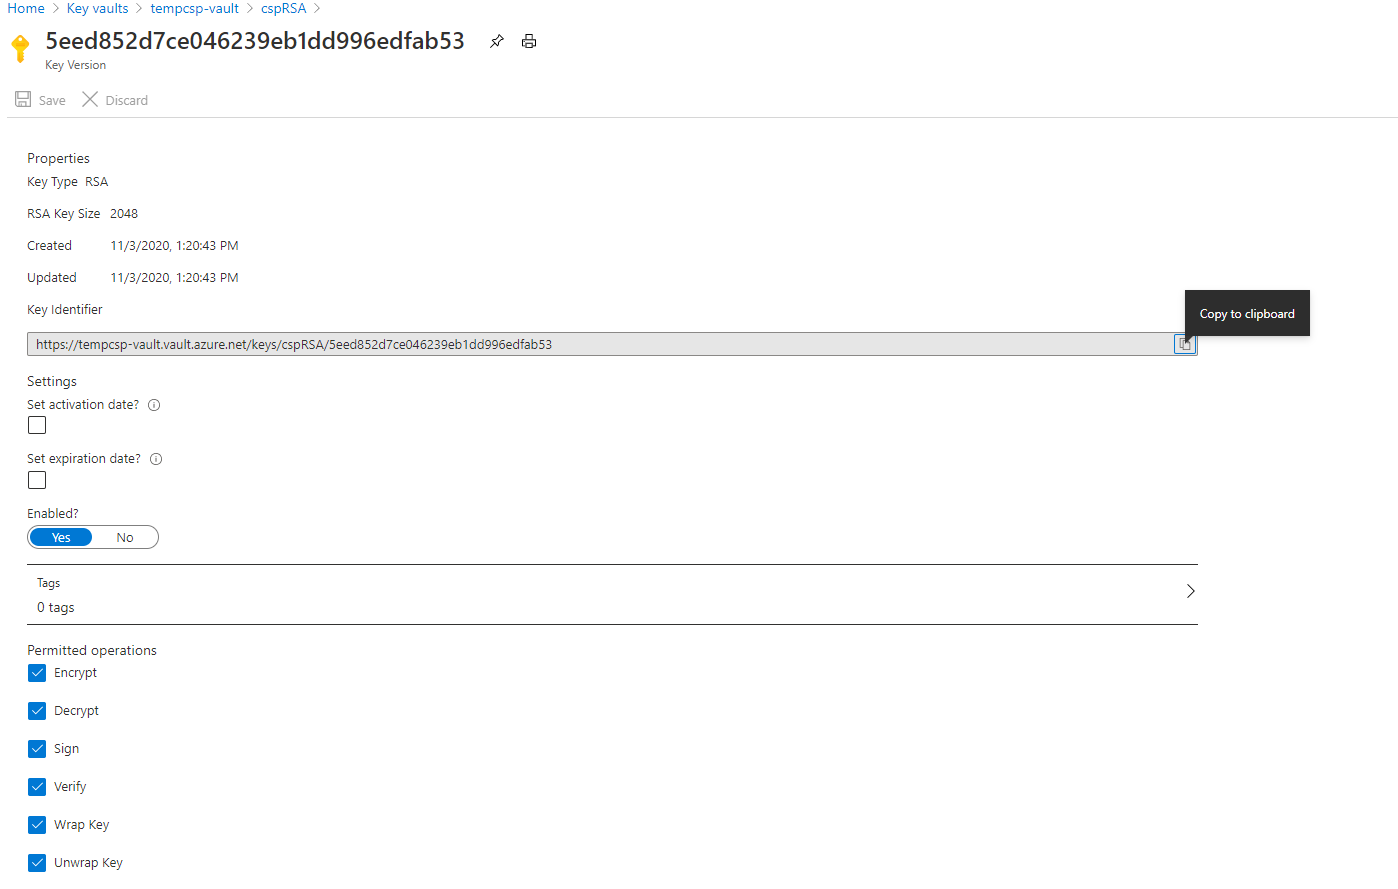
var cryptClient = new CryptographyClient(new Uri("https://keyvaultname.vault.azure.net/keys/cspRSA/5eed852d7ce046239eb1dd996edfab53"), new DefaultAzureCredential());- Use the sample here(Microsoft Employees only) to generate a new AES Key and wrap the key, which should be stored in keyvault. Run the program and take the values of
keyValuetoPutInKeyVaultandIVValuetoPutInKeyVaultfrom the below code
class Program
    {
        static async Task Main(string[] args)
        {
            Aes aes = Aes.Create();
            var cryptClient = new CryptographyClient(new Uri("https://keyvaultname.vault.azure.net/keys/cspRSA/5eed852d7ce046239eb1dd996edfab53"), new DefaultAzureCredential());
            var wrappedKey = cryptClient.WrapKey(JsonWebKeyEncryptionAlgorithm.RSA15, aes.Key);
            var keyValuetoPutInKeyVault = Convert.ToBase64String(wrappedKey.EncryptedKey);
            var wrappedIV = cryptClient.WrapKey(JsonWebKeyEncryptionAlgorithm.RSA15, aes.IV);
            var IVValuetoPutInKeyVault = Convert.ToBase64String(wrappedIV.EncryptedKey);
            //test unwrap
            var unwrappedKey = cryptClient.UnwrapKey(JsonWebKeyEncryptionAlgorithm.RSA15, Convert.FromBase64String(keyValuetoPutInKeyVault));
            var unwrappedIV = cryptClient.UnwrapKey(JsonWebKeyEncryptionAlgorithm.RSA15, Convert.FromBase64String(IVValuetoPutInKeyVault));
        }
}- Create a new secrets in keyvault with names as
NotificationEncryptionKeyandNotificationEncryptionIntialVectorwith valueskeyValuetoPutInKeyVaultandIVValuetoPutInKeyVaultfrom above step respectively. - Also, create the below secrets in the Key Vault. A new Azure App Configuration is created as part of the deployment which would be used to store all the configuration settings. Please provide that connection string in secret
AzureAppConfigConnectionstringas mentioned below.
AzureAppConfigConnectionstring: <Azure app configuration connection string>
StorageAccountConnectionString: <Storage account connection string>
MSGraphSettingClientId : <Client ID for which send.mail permissions is granted>
MSGraphSettingClientCredential: <Client Secret for which send.mail permissions is granted>
CosmosDBURI:<URI of CosmosDB(eg. https://docdb.documents.azure.com:443/). Required, only if you are using Cosmos DB as Storage>
CosmosDBKey:<Primary Key of CosmosDB. Required, only if you are using Cosmos DB as Storage>
ClientSecret:<The Client Secret of AAD appId, which is going to be given as ClientId in below QueueProcessor settings >
The Below settings have to be configured for the Notification Services to be up and running. Copy below settings to any json file and edit settings as per your choice.
Skip MSGraphSetting section in below json, if you want to use DirectSend
{
    "AppConfig": {
        "ForceRefresh": "refresh"
    },
    "ApplicationInsights": {
        "InstrumentationKey": "__InstrumentationKey__",
        "ComponentId": "__ComponentId__",
        "ComponentName": "__ComponentName__",
        "Service": "__Service__",
        "ServiceLine": "__ServiceLine__",
        "ServiceOffering": "__ServiceOffering__",
        "TraceLevel": "Information"
    },
    "Authority": "https://login.microsoftonline.com/72f988bf-86f1-41af-91ab-2d7cd011db47",
    "BearerTokenAuthentication": {
        "Issuer": "https://login.microsoftonline.com/72f988bf-86f1-41af-91ab-2d7cd011db47",
        "ValidAudiences": "<Valid client Ids separated by semicolon - required to get the calls authenticated>"
    },
    "CosmosDB": {
        "Container": "__CosmosDBContainer__",
        "Database": "__CosmosDBDatabase__"
    },
    "EnvironmentSetting": {
        "EnvironmentType": "__EnvironmentType__"
    },
    "KeyVault": {
        "RSAKeyUri": "__RSAKeyUri__"
    },
    "MSGraphSetting": {
        "BaseUrl": "https://graph.microsoft.com",
        "Authority": "https://login.windows.net/{0}",
        "BatchRequestLimit": "4",
        "BatchRequestUrl": "$batch",
        "ClientId": "<ClientId of AAD app for which graph mail.send has been consented>",
        "EnableBatching": "true",
        "GraphAPIVersion": "v1.0",
        "GraphResourceId": "https://graph.microsoft.com",
        "SendMailUrl": "me/sendMail",
        "SendInviteUrl": "me/events",
        "TenantId": "72f988bf-86f1-41af-91ab-2d7cd011db47",
        "UserAssertionType": "urn:ietf:params:oauth:grant-type:jwt-bearer"
    },
    "NotificationProviderType": "<DirectSend or Graph depending on your provider type>",
    "RetrySetting": {
        "MaxRetries": "__MaxRetries__",
        "TransientRetryCount": "__TransientRetryCount__"
    },
    "StorageAccount": {
        "BlobContainerName": "__BlobContainerName__",
        "MailTemplateTableName": "__MailTemplateTableName__",
        "EmailHistoryTableName": "__EmailHistoryTableName__",
        "MeetingHistoryTableName": "__MeetingHistoryTableName__",
        "NotificationQueueName": "__NotificationQueueName__"
    },
    "StorageType": "<StorageType is either StorageAccount or DocumentDB>",
    "UserTokenSetting": {
        "Authority": "https://login.microsoftonline.com/72f988bf-86f1-41af-91ab-2d7cd011db47/oauth2/token",
        "ClientId": "<ClientId of AAD app for which graph mail.send has been consented>"
    }
}
Note: BlobContainerName and NotificaitonQueueName should contain only "small alphabates" and "-".
From Azure portal, navigate to Azure App Configuration that has been created in deployment step. From left pane select Operations -> Import/export and Enable Import. select below settings from drop down list
Source Service - Configuration File
For language - Other
File type - Json
Source file - <upload the json file that has been edited in above step>
Separator - : (colon)
Prefix - <leave it empty>
Label - Common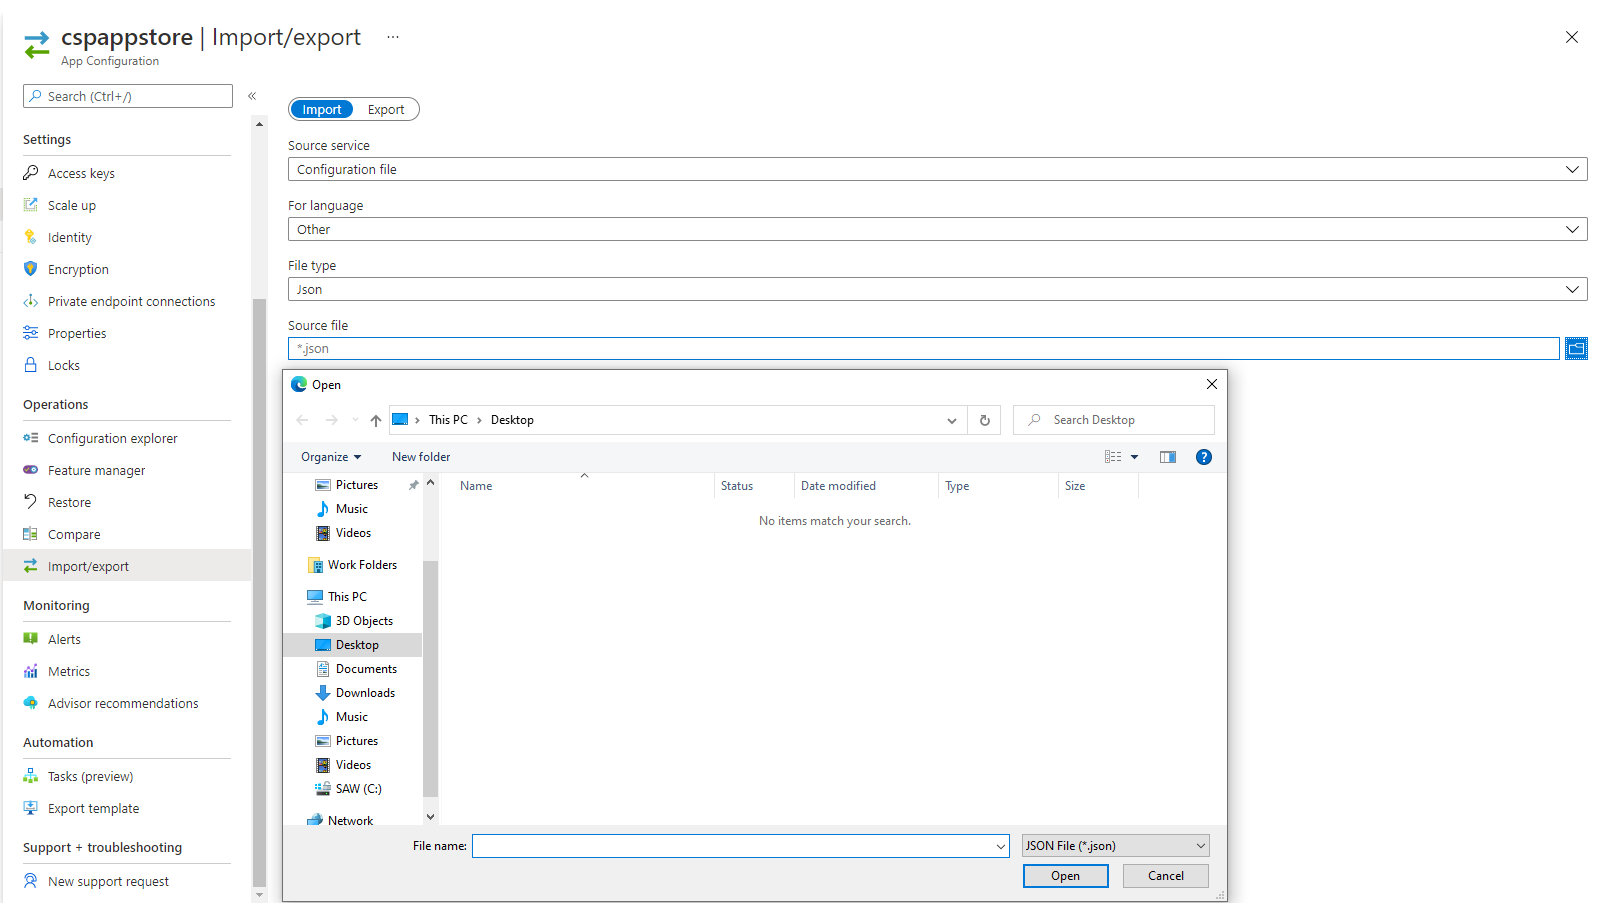
Please note, The Label should be Common for all of the above settings.
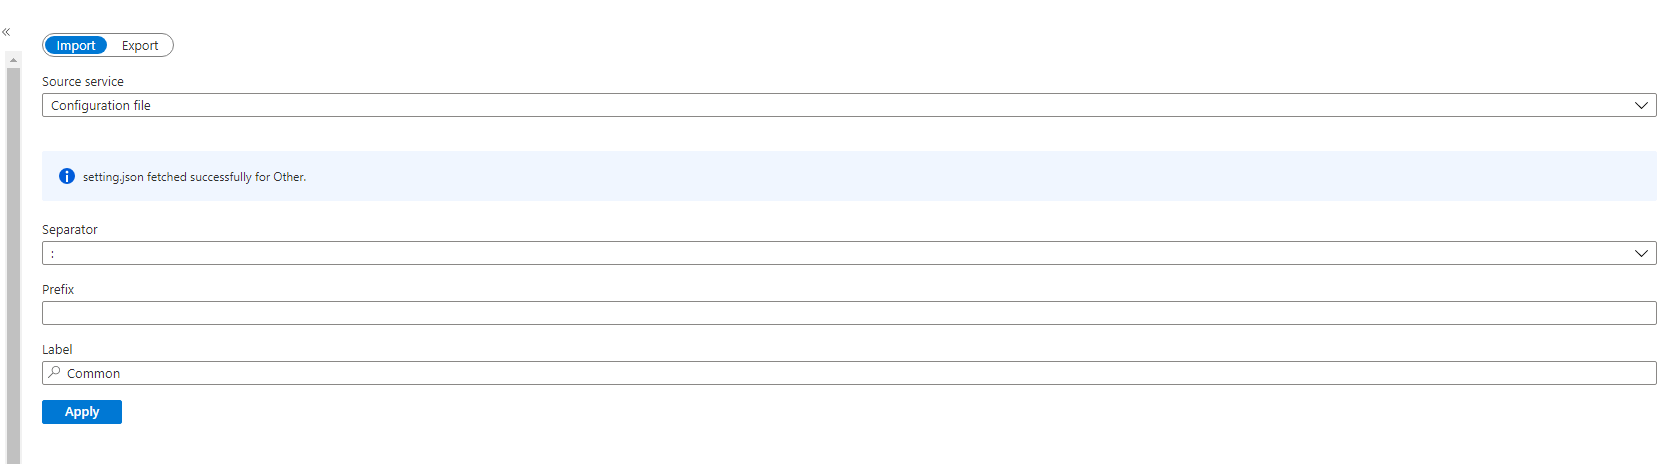
and select Apply button
Similar to above,below settings are to be configured for Notification Handler use label Handler while saving below settings in the Azure App Configuration. Or, manually add the setting by navigating to Configuration Explorer -> Create -> Key Value by providing Key as AllowedMaxResendDurationInDays.
This value will used to validate number of days . if you use this endpoint /v1/email/resend/{applicationName}/bydaterange
"AllowedMaxResendDurationInDays": "__AllowedMaxResendDurationInDays__"The below settings are to be configured for Notification Queue Processor with label QueueProcessor Save below settings to any json file and edit them and import to the azure app configuration with label QueueProcessor as per the procedure mentioned above.
{
    "ClientId": "<Client Id which is required to communicate with the notification service whose secret was given as ClientSecret in above keyvault settings>",
    "HttpTimeOutInSeconds": "500",
    "NotificationServiceEndpoint": "__https://<notificationservicedeployed>.azurewebsites.net/__"
}
The below settings are to be configured for Notification Service Save below settings to any json file and edit them and import to the azure app configuration with label Service as per the procedure mentioned above.
Skip DirectSendSetting section in below json, if you want to use MS Graph
{
    "DirectSendSetting": {
        "FromAddress": "__DirectSendSettingFromAddress__",
        "FromAddressDisplayName": "__DirectSendSettingFromAddressDisplayName__",
        "SmtpPort": "25",
        "SmtpServer": "__DirectSendSettingSmtpServer__"
    },
    "MailSettings": "[{\"ApplicationName\":\"<Your app name>\",\"MailOn\":true,\"SendForReal\":<false if you are using dev or UAT environment and don't want send notifications to actual users & true if you are using prod environment and want to send to actual users>,\"ToOverride\":\"<The to address to which emails can be sent if SendForReal setting is false, would be considered only if SendForReal is false>\"}]"
}
Note: ApplicationName from above MailSettings has to configured in the ApplicationName of ApplicationAccounts secrets that going to be stored in the keyvault as per below Direct Send or Graph Settings and remember to use this ApplicationName when consuming the Rest end points.
Go to your key-vault created for your applications.
Add secret Name ApplicationAccounts with Value in below format:
[
  {
    "ApplicationName": {your application name},
    "ValidAppIds": {semi-colon separated client-ids which can be used for authentication}
  }
]
If you are using DirectSend, add below setting in Function App Configuration, which will enable parallel processing of messages
"AzureFunctionsJobHost__extensions__queues__batchSize": 16
Head on to your key-vault created for your applications.
Add secret Name ApplicationAccounts with Value in below format:
[
  {
    "ApplicationName": {your application name},
    "ValidAppIds": {semi-colon separated client-ids among which one app id should be the one that has got graph mail.send permission},
    "FromOverride": {service account user name which has "Send-As" permission which will appear in From field when email will be sent and this field is optional},
    "Accounts": [
      {
        "AccountName": "SA1",
        "PrimaryPassword": "<mandatory>",
        "SecondaryPassword": "<optional>",
        "IsEnabled": <true-if it has to be used, false-if the account shouldn't be used>
      },
      {
        "AccountName": "SA2",
        "PrimaryPassword": "<mandatory>",
        "SecondaryPassword": "<optional>",
        "IsEnabled": <true-if it has to be used, false-if the account shouldn't be used>
      }
    ]
  }
]
Procuring mail-box with Send-As permission explains how to create a new mail box and grant the send-as permission. If for example, a new mailbox mailbox@microsoft.com has been created and its address has to be overridden with your application's from address which is frombox@microsoft.com, please configure like below.
"fromoverride": "frombox@microsoft.com",
"Accounts": [
    {
        "AccountName": "mailbox@microsoft.com",
        "PrimaryPassword": "",
        "SecondaryPassword": "",
        "IsEnabled": true
    }